

Have you ever broken or damaged a button or trigger on your Xbox One controller and need to know how to open it?
XboxDIY’s easy-to-follow, step-by-step repair guide will walk you through how to take apart an Xbox One controller so you can perform repairs, mods, cleaning, or paint your controller shell a custom color.
Opening an Xbox One controller might seem like an intimidating task, but it’s often a necessary step for gamers who want to keep their gear in top shape or customize their experience.
Much like our other Xbox One repair and troubleshooting guides, most of these procedures can be performed with a few helpful tools and some extra attention to details.
Let’s dive in!
In This Repair Guide:
Why would you want to open an Xbox Controller?
There are plenty of reasons why you might want to open up an Xbox One controller.
Maybe you’re dealing with frustrating stick drift or unresponsive buttons that are holding you back in your favorite games. Perhaps you want to breathe new life into an older controller with a thorough cleaning or replace worn-out parts to keep it performing like new.
For the creative types, opening the controller allows for tasteful (or useful) mods, like swapping out shells for a custom look or upgrading to tactile switches for enhanced gameplay.
Whatever your reason, this guide will help you complete the first step of your controller repair or upgrade project.
(If you’re looking for real, officially supported customization – get an Xbox One Elite controller. When on sale, it’s worth every penny.)
Supplies
There are a few tools that you’ll need to open your Xbox One controller:
- Xbox One Controller
- Torx T8H and T6 Screwdrivers
- Plastic Trim Tool (Good to have for any electronics or car repairs)
- Replacement Controller Parts (optional)
Step by Step Instructions for Removing the Xbox Controller Shell
Step 1 – Remove the Battery Pack

The first thing you need to do is remove the battery pack on the back of the Xbox One Controller. You’ll need this later (duh), so set it aside.
Related: Xbox 360 No Battery Pack Fix
Step 2 – Remove the Xbox One Controller Handle Covers

The next step of opening an Xbox One controller is to remove the handle covers. This will allow you to access the Torx screws to remove the front and back panels of the controller controller shell
I’d highly recommend using something like a small plastic trim tool so you don’t damage the plastic on the controller.
If you don’t happen to have a plastic trim tool, you can gently pry the plastic cover handles off with a small flathead screwdriver.
Note: This may damage the plastic finish on your controller.
The easiest way to remove the handles is to insert your plastic trim tool or flathead screwdriver at the base of the handle where the back, sides, and front of the controller molding all meet.

Once you get hold of an edge, gently pry it off the controller. You might hear a few snaps – those are typically the clips releasing. Just make sure nothing is broken in the process.
If you hear loud, plastic-breaking snaps – you might in trouble. Eek. This is why using a trim tool is important.
But in a pinch, you can always buy replacement Xbox One controller parts on Amazon if you break something learn a valuable life lesson in the process.
Step 3 – Remove Torx Screw Behind the Battery Pack
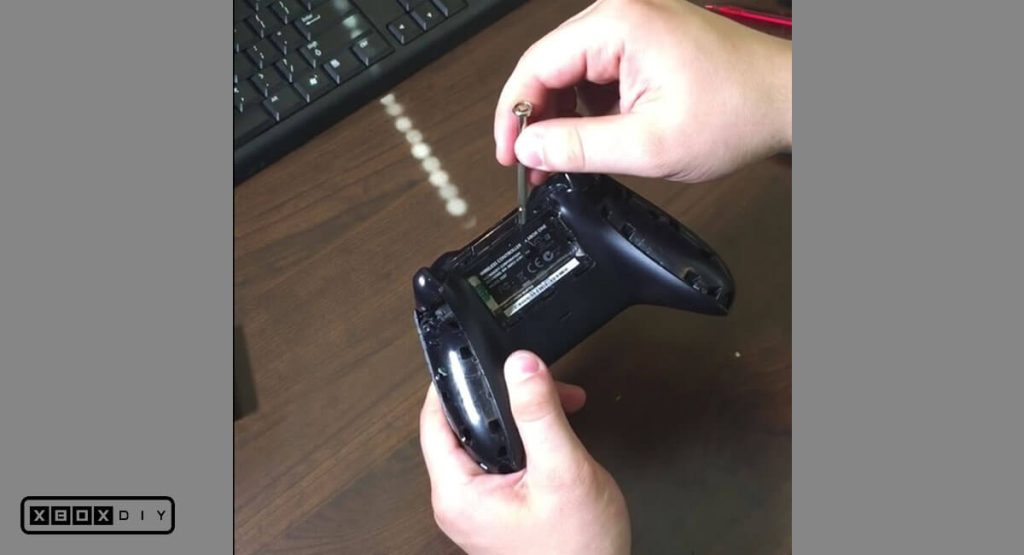
After removing the Xbox controller handle covers, you’ll need to move to the next step of opening your Xbox One controller.
Located behind the battery pack cover is a sticker with device and warranty information. The middle of this sticker is covering a screw that needs to be removed to separate the front, and back of the controller from the motherboard and internal hardware.
This will void your warranty on the controller. Microsoft will not repair a controller or console that has been “tampered” with.
Once you’re ready, poke a hole in the sticker with your screwdriver. Remove the screw behind the sticker and set it aside in a safe place for when we reassemble the Xbox controller.
Step 4 – Remove the Remaining 4 Torx Screws from the Xbox One Controller

The are 4 additional Torx screws located in the corners behind the handles of the controller.
Use your Torx Screwdriver to remove the 4 screws. Set them aside for when we reassemble the Xbox One controller.
This is the part where you could theoretically get away with using a flathead screwdriver. It doesn’t work well, and it really takes some muscle to get the screws out. The worse thing is the screws might be damaged permanently, making putting an Xbox One controller back together very, very difficult.
I would highly recommend buying a cheap Torx Screwdriver set. This will guarantee that your screws stay undamaged and keep your controller together properly, along with allowing for future modifications. It also comes in handy for other Xbox and home DIY projects.
Step 5 – Remove Front and Back Panels of the Xbox One Controller

The final part of opening an Xbox One controller is removing the front and back panels. It’s a little bit more complicated than what you may have imagined.
Be careful once removing the front and back panels as wires, circuitry, and other parts are now exposed and susceptible to damage.
Don’t Be Afraid to Open Your Xbox Controller!
That’s an easy-to-follow guide on How to Open Your Xbox One Controller, even without a torx screwdriver.
You can use a similar method for opening an Xbox One Elite Controller, which we’ll bring an article to you about soon.
If you’re interested in more information on how to open or disassemble your Xbox One controller head on over to XboxDIY on YouTube. Have questions? Drop us a line on our Contact page. Game on!


0 Comments